What is hummus?
Hummus (which may be misspelled as “humis”) is a popular dish, especially in the middle east. It is of ancient Egypt origin. As a result, hummus comes from an Arabic word meaning “chickpeas”. It is a shortening from the long form “ḥummuṣ bi-ṭ-ṭaḥīna,” meaning chickpea with tahini. Hummus is a delicious and healthy dip. It is a puree made by blending tahini and chickpeas, garlic, lemon juice, and olive oil. Also, it complements flat bread like pitta. The combination tastes incredible!
Canned vs. dried chickpeas for making hummus in a blender.
If you are familiar with chickpeas, you must have known you could have them dried or canned. However, the best for making hummus in a blender is a very important question. We will compare both below, and with our analysis, we trust you will make the better choice as your need arise.
Both canned and dried chickpeas can make hummus in a blender. However, there are a few variances to consider.
Canned chickpeas are already cooked and soft. But, Dried chickpeas need more preparation and cooking time.
Canned chickpeas are easier to blend to give a greasy and smooth texture which is ideal for hummus. In contrast, dried ones have a firm texture. Furthermore, this makes the hummus slightly grainy or chunky if not blended properly.
Canned chickpeas are convenient to use and save time. On the other hand, Dried chickpeas must undergo some processes before usage. They are the best for making hummus if you have time.
Canned chickpeas usually contain salt and other preservatives. However, dried chickpeas do not need any preservatives.
Canned chickpeas may have a slightly metallic taste. As a result, it makes them less healthy than dried chickpeas. However, dried chickpeas are healthier and cheaper.
Sometimes, hummus made with dried chickpeas has a nuttier taste and a thicker texture. But, it is the preference of some individuals. However, you will need to soak them before use in lots and lots of water if you decide to use dried chickpeas. After that, rinse and cook them until they are soft and tender. This can take about one hour with the stove or 30 minutes in a pressure cooker. Once you cook the chickpeas, use the same recipe for “making hummus in a blender with canned chickpeas”. This will also work for it.
Summing up, the choice between canned or dried chickpeas is subjective. It is a choice of personal preference and convenience. Canned chickpeas are a great option to save time and effort. However, you can use dried chickpeas if you prefer a more natural and homemade approach. Also, if you are allergic to canned chickpeas additives, avoiding them will be best.
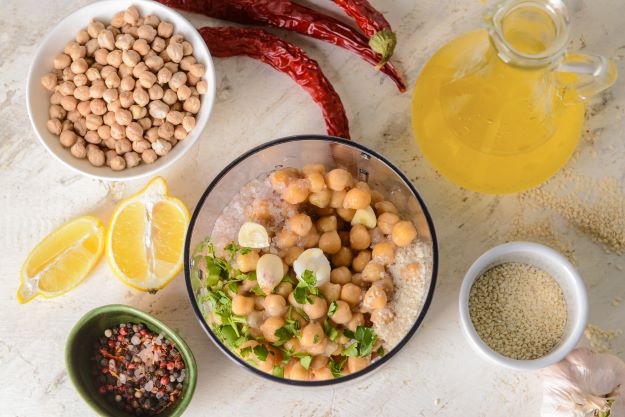
Preparation of ingredients for a classic hummus recipe.
A classic hummus recipe wouldn’t prepare itself. It is worth understanding how to prepare the ingredients for a classic hummus recipe. Trust us, if you get this part right, it will certainly leave a wow on your lips as it influences the hummus. Below is an explanation of the ingredients and the tools needed.
Ingredients Required (the quantity solely depends on the size of serving you want to make):
Dried chickpeas or cans of chickpeas
Tahini (sesame paste)
Lemon juice
Garlic cloves
Ground cumin
Salt
Water
olive oil
Here are the steps to prepare the ingredients for the classic hummus recipe:
Dried chickpeas
Soak them before dawn or for 8-10 hours in cold water with about 5ml of baking soda. Using a strainer or colander, Drain and rinse the chickpeas.
Cook the dried chickpeas in boiling water until they are tender. However, this may take 1-2 hours. If you own one, you can utilize a pressure cooker to cook them faster.
Strain the cooked chickpeas and reserve some of the cooking liquid.
Canned Chickpeas
If you opt for this, you only need to drain and rinse thoroughly. This is because the manufacturer cooked them before canning.
Tahini (sesame Paste)
This does not need any further preparation. The paste comes roasted or in a raw form. Note that the Raw tahini is lighter in color and has a less strong flavor. It also contains a higher nutrient content than roasted tahini.
Garlic Cloves
Peel and chop the garlic cloves. This makes it easier to blend with other ingredients.
Other ingredients need no further preparation. They are ready to use.
The Tools required:
Nutri-bullet blender or Vitamix blender
Kitchen bowls
Strainer
Cooker (preferably pressure cooker)
How to prepare chickpeas for hummus? – canned and dried.
No chickpeas, No hummus! Chickpeas are the most active ingredient in hummus. You could have them come in a canned form which the manufacturer has already processed. They also come in dried forms, a product of careful cultivation, drying, and packaging. These two variations of chickpeas have different ways of preparing them. Nevertheless, the result is similar. Here is an explanation for it:
Canned Chickpeas: This passed through the cooking process before it got canned. You only need to drain and rinse thoroughly to remove excess salt or preservatives. This is because they can significantly affect the outcome of your hummus if you don’t. You can now use the chickpeas in the hummus recipe.
Dried Chickpeas: Soak the dried chickpeas in a lot of water overnight or for at least 8-10 hours. Drain the water, rinse the chickpeas, and transfer them to a pot. Submerge the chickpeas in water and bring them to a boil. Under low heat, simmer the chickpeas for an hour or two or until it becomes tender. These tender chickpeas can then be easily mashed with a fork. Drain the cooked chickpeas and let them cool down before using them in the hummus recipe.
Step-by-step process of making the best hummus with your blender
If you had ever tasted humus at its best, you would keep being an Oliver (you will always want more). This starting guide/ user’s guide will help in knowing how to make hummus in a blender:
What you will need (This will make about 0.5 liters of hummus) :
One can of chickpeas drained and rinsed OR prepared dried chickpeas of equal volume.
Two tablespoons of tahini
Two cloves of chopped garlic
1.25 cups of olive oil
Lemon Juice
2-4 tablespoons of water (if needed)
Salt to taste
Nutri-bullet blender or Vitamix blender
What to do:
- Prepare the ingredients as described earlier.
- Add the chickpeas, garlic, tahini, and lemon juice to the Nutri Bullet or Vitamix blender. You can then add the olive oil and salt before the blending ends.
- Start with a pulse and do so a few times. This will help to break the chickpeas.
- Blend the mixture at max for a minute or two. You can do this till the hummus is smooth and creamy. If the mixture is too thick, add adequate water and blend again.
- Stop the Vitamix blender and taste the hummus. Vary the input as needed by adding more salt, lemon juice, or tahini if required. If the hummus is still thick, add olive oil or water until it’s perfect.
- Blend the hummus for another minute. Ensure it is well-mixed and smooth.
- Transfer the hummus to your plate and add olive oil. Sprinkle with some paprika or parsley for added flavor and color.
- Store in a can to get canned humus if you are not set to use it. If you are, Serve with pita bread, vegetables, or crackers for dipping.
Making hummus with canned chickpeas
The process of making hummus with canned chickpeas is the same. This doesn’t mean it will give you “canned hummus”. The storing technique brings about that. Hummus made with canned chickpeas tends to give a uniform consistency without hassle. They are quick and convenient to use, but the side effect is the salt content and preservative. Generally, hummus can be made with canned chickpeas. You just have to follow the process mentioned in “How to make hummus in a blender”.
Making hummus with dried chickpeas
Making hummus with Dried chickpeas is more stressful. This is due to the soaking and cooking time required. Yet, some prefer it because of its nuttier taste when compared to its counterpart. The process is the same as how to make hummus in a blender.
Vitamix Hummus or Nutribullet hummus. Which way?
You can use a Vitamix blender, Nutribullet blender, or any free blender you prefer to make hummus. Blenders are better than food processors because they can make the hummus smoother. When choosing a blender, consider your budget and personal preference. A Vitamix hummus recipe is the same as the classical one mentioned above. The only difference is in the blender type used.
Tips and tricks to make your hummus super creamy and more delicious.
Everyone loves the little satisfaction they can get, and it’s the same with hummus. These Tips and tricks are a bonus to you on how to make hummus in a blender.
Soak and cook the chickpeas: If you are using dried chickpeas, soak them overnight. If not overnight, 8-10 hours before cooking them will do. This will ensure the chickpeas are soft and easy to blend, resulting in a creamier hummus.
Use high-quality tahini: Tahini is a crucial ingredient in hummus. Using a good quality brand will make a significant difference in the flavor and the texture. Look for smooth, creamy tahini that has a nutty flavor.
Add ice water: Instead of regular water, add ice to the hummus to make it even creamier. The cold water will help emulsify the ingredients. This thereby creates a smooth and creamy texture.
Use a blender or food processor: A high-speed blender or food processor blends hummus. They can blend the ingredients quickly and efficiently. This results in a smooth and fluffy texture.
Blend the hummus for a longer time: Blend it for at least 2-3 minutes or until it is very smooth and creamy. A hack: The longer you blend, the smoother and creamier the outcome will be.
Drizzle olive oil on top: A drizzle on the hummus adds flavor and helps create a creamier texture. Use high-quality olive oil for the perfect result.
Add a pinch of baking soda: This can soften the chickpeas’ skin when added to the cooking water. It makes them easier to blend, resulting in a creamier texture.
Blending techniques for perfectly blended hummus every time
Your blending skills have a lot to tell about the outcome of your hummus. If you want to be a demi-god in making hummus, then you should check out these techniques:
Suitable blenders: A high-powered blender like Vitamix will give you an edge. This is because it creates a smoother and creamier hummus. Furthermore, the powerful motor can break down the ingredients more effectively.
Stage the blending: You don’t want to be that guy that rushes to finish quickly. Although, it depends on the blending size you need to make. Even at that, you should start with chickpea, tahini, lemon juice, and garlic. After that, you can slowly add the olive oil while the blender runs.
Use the tamper tool: the tamper tool helps push ingredients toward the vortex. The Vitamix blender comes with this. This, in turn, ensures you leave no chunks.
Use water: Practice a tablespoon of water at a time. Try Considering this when the hummus is too thick or not blending properly.
Adjusting the consistency and flavor of your hummus
A one-star hummus is because of uneven consistency and flavor. Yet, you want to avoid being on this side of history. Use these tips below to make your five-star hummus.
Consistency: Add some liquid if the hummus is too thick. In any case, if it is too thin, then you should add more chickpeas. The very thing you want is to be within. For clarity, you only need to add a small part of the ingredients at a time to the hummus.
Flavor: The hack to getting the perfect flavor is to use special ingredients. For example, cumin, paprika, or parsley. Also, adding sun-dried tomatoes will give it some uniqueness.
Texture: If you like smooth texture, you should blend longer. Conversely, use some chickpeas at the end of blending to make it chunky.
Creaminess: Olive oil is the secret recipe to creaminess, but be careful not to overdo it. This is because it can make the hummus too oily in the end.
To sum up, if you try the above prescription, you can never unlearn it.
How to make hummus in a blender: storing techniques.
Air is the major catalyst for having bad hummus. The storage technique used influences how long the hummus can stay without spoiling. Find some common storage technique and their estimated duration before going bad below:
Refrigerate: Store your hummus in an airtight container and place it in the fridge. You will have it for 5 days, to say the least.
Freeze: For longer-term storage, Put the hummus in a freezer-safe container. Leave about 25cm of space at the top. This helps it expands. It will last for five months at a minimum in the freezer.
Cover with olive oil: Covering your hummus with a thin layer of olive oil can help keep it fresh for a little longer. This creates a blockade that prevents air from reaching the hummus. You can do this before freezing. Since Olive oil is already an ingredient, you only need to stir it together when thawed.
Use small containers if you plan to eat your hummus in portions or sell it in a restaurant. To blow your mind, you can make canned hummus from it. Divide it into smaller containers before storing it. This way, you won’t have to open the entire container every time you need to use it, as that makes the hummus go bad quickly.
Label and date: Label your containers with the date you made the hummus. This helps you keep a tab of how long you have stored it.
Mix before serving: Give your stored hummus a good stir before serving. This combines any liquid or settled ingredients at the bottom of the container.
Health benefits of hummus: How to make it even healthier?
Hummus is a nutritious food that offers several health benefits. Some of the health benefits of hummus are:
Rich in nutrients: Hummus is a good source of protein, fiber, vitamins, and minerals. It contains chickpeas which are high in protein, folate, iron, and zinc. Tahini is rich in healthy fats, calcium, and antioxidants.
Good for heart health: Hummus is rich in mono-unsaturated and poly-unsaturated fats. Scientists have linked these to lower cholesterol levels. You don’t have to worry about any heart disease.
Helps with digestion: The fiber in hummus helps promote digestive health and regularity.
Weight Management: The protein and fiber in hummus can help you feel full for longer. This reduces the likelihood of over-eating, thus helping with weight management.
To make hummus even healthier, here are some tips:
Use less oil: Hummus is traditionally made with healthy fat, olive oil. Reducing the quantity of oil in the recipe can make it even healthier. It can give a fat-free hummus.
Add more vegetables to your hummus. Vegetables can increase the nutrient content and add more flavor to your hummus. Roasted red pepper, spinach, or carrots are great options.
Use less salt: Reducing the amount of salt in your hummus can help lower your sodium intake. This makes hummus healthier.
Serve your hummus with whole-grain crackers. Fresh veggies like carrots, celery, or cucumber give a healthier snack. This is a better option than using processed crackers or chips for dipping.
How to serve your hummus?
Here are some tips for serving your hummus:
As a dip: Hummus is traditionally served with pita bread or crackers. However, trying it with fresh carrots, cucumber, bell pepper, or celery will wow you.
As a sandwich spread: Spread hummus on a sandwich instead of mayonnaise or mustard. It adds a creamy texture and a delicious flavor.
As a salad dressing: Mix hummus with a little water, lemon juice, and oil to make a creamy salad dressing.
As a pizza topping: Spread hummus on a pizza crust instead of tomato sauce. Add your favourite toppings like vegetables, olives, or cheese.
As a pasta sauce: Mix hummus with cooked pasta and vegetables for a delicious and healthy meal.
As a side dish: Serve hummus as a side dish with fish, grilled chicken, or tofu for a complete and satisfying meal.
Final words
The hack to making great hummus in a blender is to use high-quality ingredients. Blend them vigorously till you get a smooth and creamy consistency.
To make hummus in personal blenders or commercial blenders, start with well-cooked chickpeas. This can be in canned or dried form. Add baking soda to the cooking water to help soften the chickpeas and make them easier to blend.
In conclusion, making hummus in a blender is a simple and satisfying process. It yields a delicious and healthy dip. With practice and experimentation, you can create your perfect hummus recipe.
Some Frequently Asked Questions
Is hummus healthy?
Yes, it is. The ingredients contain low-fat contents such as olive oil.
How long does homemade hummus last?
It depends on the storing technique you have utilized. It can go from 5 days to as high as five months.
Can I make hummus oil-free or low-fat?
Yes. To achieve that, only use high-quality olive oil. Also, try reducing the volume of oil used.
Can I use an immersion blender to make hummus?
Like the Nutribullet and Vitamix blender, you can also use the immersion blender.
Do I need to peel the chickpeas?
You don’t need to. Nevertheless, soak and rinse properly.
Can I make hummus without tahini?
Yes, you can. But you will likely want more using the tahini.